

We are often asked at InfoTrack how to reduce the size of a PDF filing to ensure that is accepted by a court’s case management system and therefore successfully eFiled.
There’s a whole range of rules out there on file sizes depending on what back-office system the court is using to manage the filings it receives. In most eFiling courts throughout the U.S. the file must be below 35 MB., though each state court may have its own limits.
In general, though, there’s very little reason for PDFs to be hundreds of megabytes large unless they contain exhibits that absolutely must be saved as very high-resolution photographs. By following just a few simple steps, even filings that are hundreds of pages long can be brought down to meet requirements.
How to determine the size of your PDF document
If you’re using Adobe Acrobat, checking the size of your PDF is simple. Just click on File, then Properties. You’ll see lots of information about your document, including its size.

Alternatively, you can navigate to the folder containing your document, right-click on it, and click Properties.

Note: KB stands for kilobytes. There are 1,000 kilobytes in 1 megabyte, so a 35 MB document can be up to 35,000 KB.
Larger files will take longer to upload, are cumbersome to share electronically (via email, for instance), and will use up your law firm’s file storage more rapidly. And even when the courts accept larger file sizes, they prefer to handle smaller, optimized files.
So, how should you set about reducing the size of your PDF documents? Here are five quick tips.
#1. Avoid scanning PDFs wherever possible
It’s a common misconception that, to create PDFs, or to combine multiple documents and exhibits into a single PDF, you need to print everything out and scan it together. Electronically converted files are generally much smaller in size than scans.
You only ever need to scan documents that exist in paper form only — all other documents can be electronically converted from the original file by saving them as PDFs. Furthermore, individual documents can be quickly combined as PDFs using software such as Adobe Acrobat, avoiding any need to print out documents to combine them.
Read more: How to correctly redact a PDF
#2. Save as “Reduced Size PDF”
If your file is still very large after you’ve created it electronically, rather than by scanning, there are still some steps you can take. The simplest is to re-save your file as a reduced-size PDF.
In the latest version of Adobe Acrobat, open the PDF you wish to re-save as a smaller file, choose File, Save as Other, and then Reduced Size PDF. You’ll be prompted to select the version compatibility you need — it defaults to Retain existing to keep the current file settings — and then you can click OK to save.

Another built-in feature in Adobe Acrobat allows you to save the file at a reduced size. Navigate to File, then click Reduce file size. You’ll be prompted to choose the folder where you want to save your compressed document. Double click the folder to save it.

These methods are quick and simple, but be warned that it will reduce the quality of images and will remove digital signatures. If you want more control over how your PDF is compressed in Acrobat, use the optimization method described below instead.
Read more: How to convert a fillable form for eFiling
#3. Use Adobe Acrobat’s PDF Optimizer
Sometimes you’ll want more control over which elements of your document are reduced in quality or removed. In these circumstances, you should choose the PDF optimizer tool.
Before you optimize a file, it’s a good idea to audit the file’s space usage — review which elements, such as fonts, images, and so on, are using the most data. The results of this may give you ideas about where best to reduce file size.
To begin optimization, open your PDF in Acrobat, click File, Save as Other, and then Optimized PDF. In the dialog box that appears, click on Audit space usage in the top right-hand corner. You’ll see a table of information a bit like this:
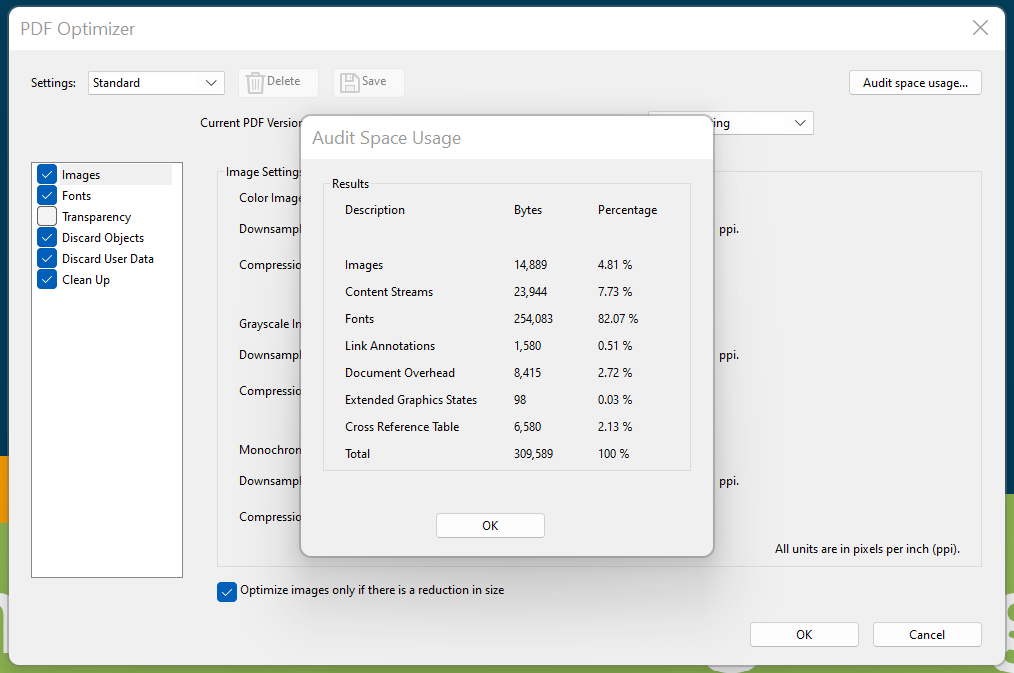
The optimizer gives you complete control over the elements of your PDF that will be compressed. Review the elements of your document that are the largest, and use that information to help you decide what can be compressed.
Select the checkbox next to a panel (e.g. Images, Fonts), and then select options in that panel. There’s a lot of choices, so it’s worth reading through the Adobe help file to understand what each option does.
Okay, we know that not everyone uses Adobe Acrobat. What options are available to you if you’re using other software or only the basic Adobe Reader? Here are two more options for reducing the size of your PDF file if you’re not using Acrobat.
#4. Reduce the size as you save in Word
In some versions of Word, to convert a document to PDF, you use the Save As option. This option generally produces a fairly small file, depending on the number of images in your document. However, if you find that your Word-converted PDF is still too large, there is a further option in Word that will produce a significantly smaller file. Here’s how to use it:
Open the Word document you are going to convert to PDF. Click on the File button and then Save As. In the Save as type menu, select PDF and enter your preferred file name. Here’s the extra step: where it says Optimize for at the bottom of the dialog box, select Minimum size (publishing online).

This may not be available in newer versions of Microsoft Word. If you do not have this option and your file size is still too large, you may need to use a different compression tool.
#5. Use a print-to-PDF tool
Other (non-Adobe) PDF tools generally contain features that will reduce the size of your PDF. However, if you’re looking for a free option, there are some available. Currently, the most downloaded free PDF creator (according to download.com) is PrimoPDF.
Once you’ve installed PrimoPDF, simply open the PDF you wish to compress (in Acrobat Reader, or a web browser, for example), press Ctrl+P to open the print dialog, select PrimoPDF from the list of available printers, and then click Create PDF.
Note that this method, like simply saving as a reduced-size PDF in Adobe Acrobat, reduces image quality and resolution.
#6. Use the Adobe online PDF compressor tool
Even if you don’t use Adobe to manage your PDFs, you can still use their free online compression tool to reduce your PDF file size before eFiling.
This is a simple drag-and-drop interface. You can also use the file selection tool to find the document on your computer.
Once you’ve compressed your document, download it back to your computer. Note that this method may also result in quality loss.
Bonus: reduce your eFiling rejections for the most common reasons
File size is not the only challenge of eFiling. A rejected eFiling can be frustrating, and the most common rejection reasons are totally preventable.
InfoTrack reduces rejection rates by reading your uploaded documents and auto-filling 95% of fields, so filings can be submitted in under 30 seconds. Court-specific validation also catches jurisdiction errors before you submit. As a result, our clients see rejection rates under 5%, against an industry average of around 9%.
Book a personalized demo to see what InfoTrack could do for your firm, or create your free account to get started right now.


